OneCloud Connect Extension: How to Setup
OneCloud Connect Extension: How to Setup

This Guide will go over the general setup of our OneCloud Connect Extension as well as go over key features such as click-to-dial, call history, CRM screen pops, etc.

Please Note: This product can be downloaded via the chrome webstore and only usable through Chrome or Edge browsers.
Setup Steps:
1. Installing the Extension
a. Downloading it via the Chrome webstore
2. Pinning Extension for Ease Accessibility
3. Sign In using your UCaaS Login
4. Navigate the Extension
Functions to Highlight:
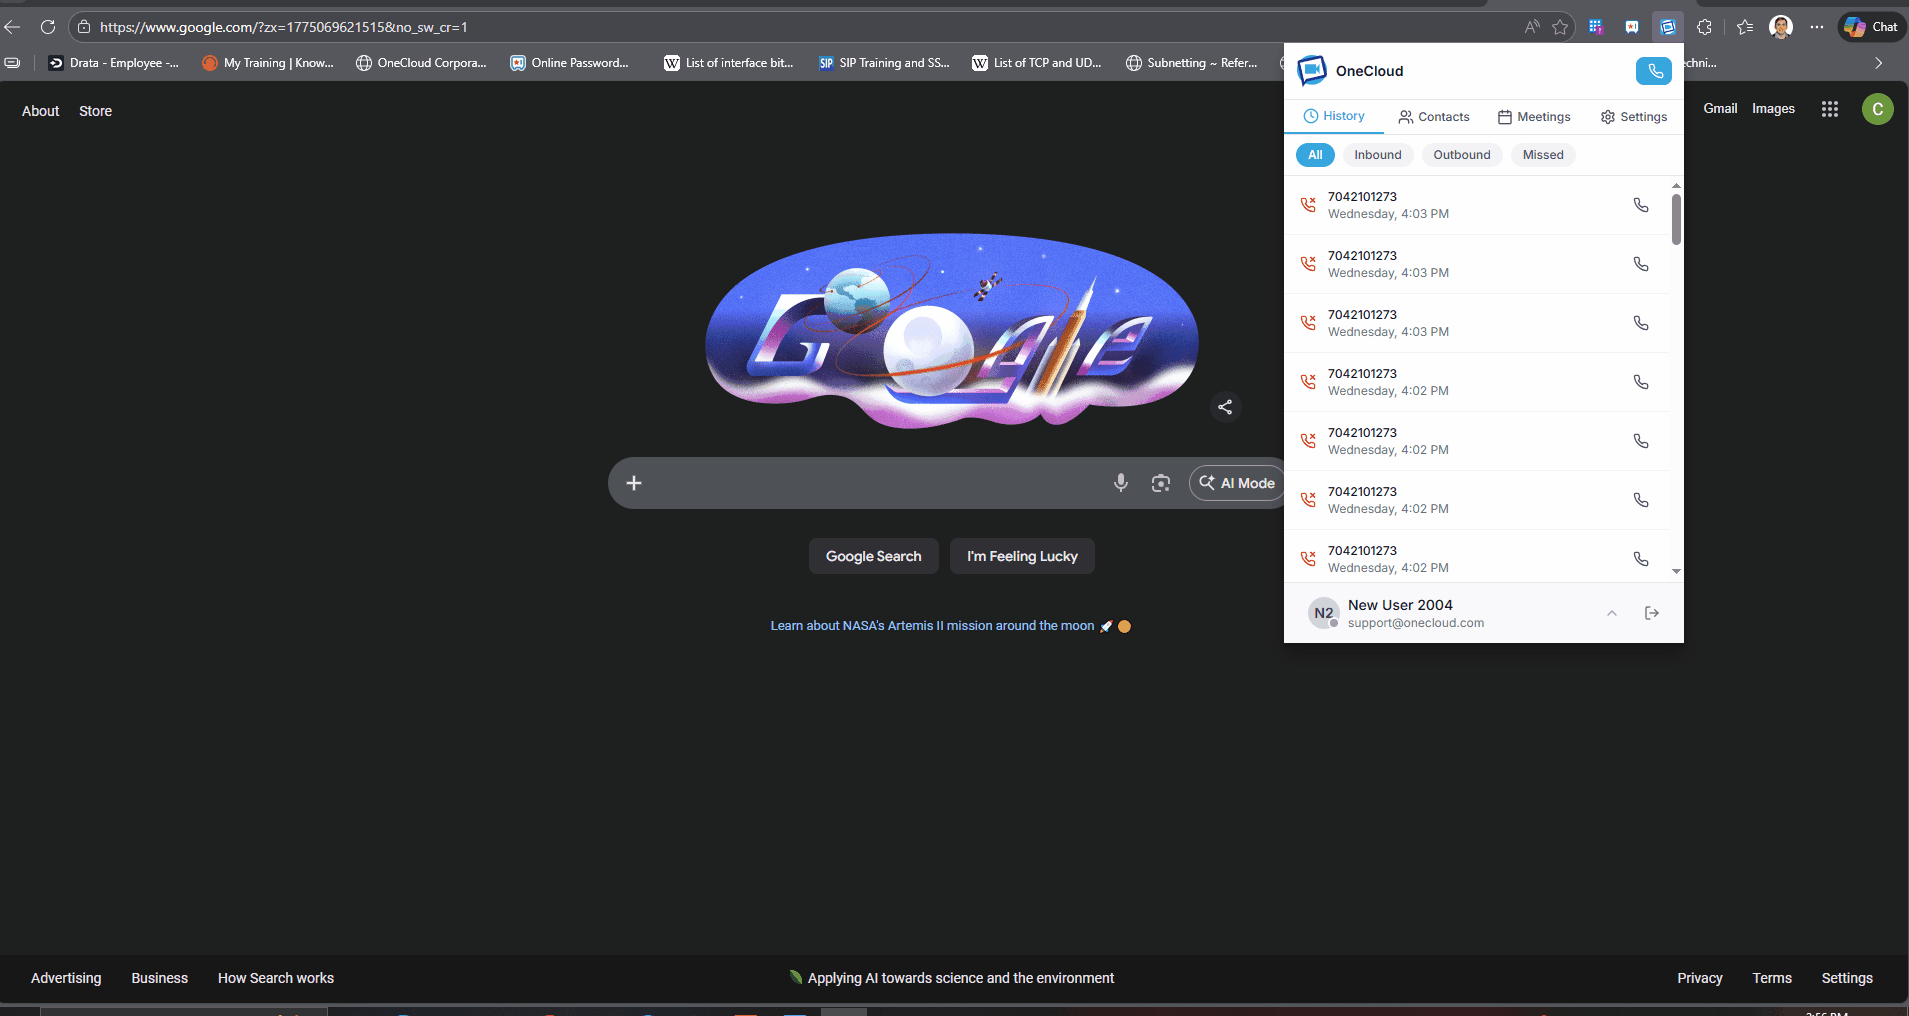
Call History - This will be synced from your OneCloud Connect Application allowing you to have access to see inbound, outbound, and missed calls.
Contacts: Similar to Call History; Contacts is synced from the OneCloud Connect Application allowing you to do outbound calling directly to the contact.
Meetings: Any Meetings scheduled through OneCloud Connect will appear under the meetings tab
Features To Highlight:
Click-to-Dial: Allows for direct calling of a phone number from the browser
Screen Pop: When an inbound call comes in this will launch the CRM in another tab and search for a contact via the Caller ID.
Call Control: Customize the device or devices you want to call with when utilizing the extension.
- Adjusting to a specific default device via the drop down in settings and enabling the "Default Device" checkbox or, with the checkbox unchecked, allow the extension to utilize your UCaaS User's answering rules when using the click to dial or direct dial within the extension.
Language: Ability to change the default language used within the extension to either English, French or Japanese.
Inbound/Missed Call Notifications: Receive notifications for inbound or missed calls to enhance visual awareness and decrease scenarios leading to missing the call.

Please Note: Some of the Screenpop to CRM links require an instance ID to properly pop within your companies CRM instance.
Below are the instructions for locating the Instance ID in the active preconfigured CRM Screen pop solutions.
Below are the instructions for locating the Instance ID in the active preconfigured CRM Screen pop solutions.
Instance ID Locations:
HubSpot:
1. Log in to your HubSpot account
2. Look at your browser’s address bar
3. Your instance ID (also called Hub ID) will appear in the URL in this format:
Zoho Desk
1. Log in to your Zoho account
2. Look at your browser’s address bar
3. Your instance ID (also called Portal Name) will appear in the URL in this format:
ConnectWise:
1. Log in to ConnectWise Manage
2. Navigate to Account Settings
3. In the left-hand menu, click Settings
4. Select Account from the dropdown
5. Under Account Information, locate Company ID
6. This value is your Instance ID
Salesforce:
1. Log in to your Salesforce account
2. Look at your browser’s address bar
3. The instance name will appear in the URL format:
https://[INSTANCE_ID].salesforce.com
Please Note: This product does not support outbound calling directly from the extension. The extension will route the call to be taken based off the answering rules in the UCaaS portal or the Default Device set in Settings.

If you have any questions or issues please reach out to OneCloud Support.
Related Articles
OneCloud Integrations | How to Setup Service Titan Integrator in the UCaaS Portal
OneCloud Integrations | How to Setup Service Titan Integrator in the UCaaS Portal Please Note: You must be an Office Manager in the UCaaS Portal and an Administrator within the Service Titan CRM to configure this Integrator Cross-Platform User ...OneCloud v44.0 Release Notes | OneCloud Support Portal
OneCloud V44.0 Release Notes New Features Added audit log entries for all successful logins and access token grants. Added support for a stronger JWT token including the ability to validate using public key. Added Fanvil v67 Device support in button ...OneCloud Integration | Setting Up HubSpot CRM Integrator in the UCaaS Portal
Guide to Setting Up the HubSpot CRM Integrator in the UCaaS Portal Important Note: You must have an Admin account set up in HubSpot and be an Office Manager Scope in the UCaaS Portal to setup this integrator and access the Recording links. User/Agent ...Google Chrome Extension for OneCloud Connect | OneCloud Support Portal
Installing the OneCloud Connect Chrome Extension 1. Using the Google Chrome browser, navigate to chrome.google.com/webstore. 2. Then “Search the store” by typing OneCloud Connect in the search box in the top left. You will then click on the OneCloud ...OneCloud Connect v3.5.0 Release Notes
Included in this release: All Releases: 3.5.0 Release Date: November 7th, 2025 New Features [Desktop] Drag and drop to attach files in chat [Mobile] Added codec selection for more flexibility in varied mobile environments Add SMS number as a contact ...